Data Cleaning for Darwin Core
Overview
Teaching: 0 min
Exercises: 120 minQuestions
How to convert dates to ISO?
How to match scientific names to GBIF?
How to convert latitudes and longitudes to decimal degrees?
Objectives
Aligning dates to the ISO 8601 standard.
Matching scientific names
Converting latitude and longitude variations to decimal degrees North and East.
Some usefull links:
Now that you know what the mapping is between your raw data and the Darwin Core standard, it’s time to start cleaning up the data to align with the conventions described in the standard. The following activities are the three most common conversions a dataset will undergo to align to the Darwin Core standard:
- Ensuring dates follow the ISO 8601 standard
- Matching scientific names to an authoritative resource
- Ensuring latitude and longitude values are in decimal degrees
Python is a high-level, general-purpose programming language. Its design philosophy emphasizes code readability with the use of significant indentation. Make sure that Python is installed on your machine. You can download Python here: https://www.anaconda.com/ R is a language and environment for statistical computing and graphics. The core R language is augmented by a large number of extension packages, containing reusable code, documentation, and sample data. You can download R & Rstudio (visual interface) here: https://posit.co/download/rstudio-desktop/
Below is a short summary of each of those conversions as well as some example conversion scripts. The exercises are intended to give you a sense of the variability we’ve seen in datasets and how we went about converting them. While the examples use the pandas package for Python and the tidyverse collection of packages for R (in particular the lubridate package), those are not the only options for dealing with these conversions but simply the ones we use more frequently in our experiences.
Getting your dates in order
Dates can be surprisingly tricky because people record them in many different ways. For our purposes we must follow
ISO 8601 which means using a four digit year, two digit month, and two digit
day with dashes as separators (i.e. YYYY-MM-DD). You can also record time in ISO 8601 but make sure to include the time
zone which can also get tricky if your data take place across time zones and throughout the year where daylight savings
time may or may not be in effect (and start and end times of daylight savings vary across years). There are packages in
R and Python that can help you with these vagaries. Finally, it is possible to record time intervals in ISO 8601 using a
slash (e.g. 2022-01-02/2022-01-12). Examine the dates in your data to determine what format they are following and what
amendments need to be made to ensure they are following ISO 8601. Below are some examples and solutions in Python and R
for them.
ISO 8601 dates can represent moments in time at different resolutions, as well as time intervals, which use “/” as a separator. Date and time are separated by “T”. Timestamps can have a time zone indicator at the end. If not, then they are assumed to be local time. When a time is UTC, the letter “Z” is added at the end (e.g. 2009-02-20T08:40Z, which is the equivalent of 2009-02-20T08:40+00:00).
Tip
Focus on getting your package of choice to read the dates appropriately. While you can use regular expressions to replace and substitute strings to align with the ISO convention, it will typically save you time if you work in your package of choice to translate the dates.
| Darwin Core Term | Description | Example |
|---|---|---|
| eventDate | The date-time or interval during which an Event occurred. For occurrences, this is the date-time when the event was recorded. Not suitable for a time in a geological context. | 1963-03-08T14:07-0600 (8 Mar 1963 at 2:07pm in the time zone six hours earlier than UTC).2009-02-20T08:40Z (20 February 2009 8:40am UTC).2018-08-29T15:19 (3:19pm local time on 29 August 2018).1809-02-12 (some time during 12 February 1809).1906-06 (some time in June 1906).1971 (some time in the year 1971).2007-03-01T13:00:00Z/2008-05-11T15:30:00Z (some time during the interval between 1 March 2007 1pm UTC and 11 May 2008 3:30pm UTC).1900/1909 (some time during the interval between the beginning of the year 1900 and the end of the year 1909).2007-11-13/15 (some time in the interval between 13 November 2007 and 15 November 2007). |
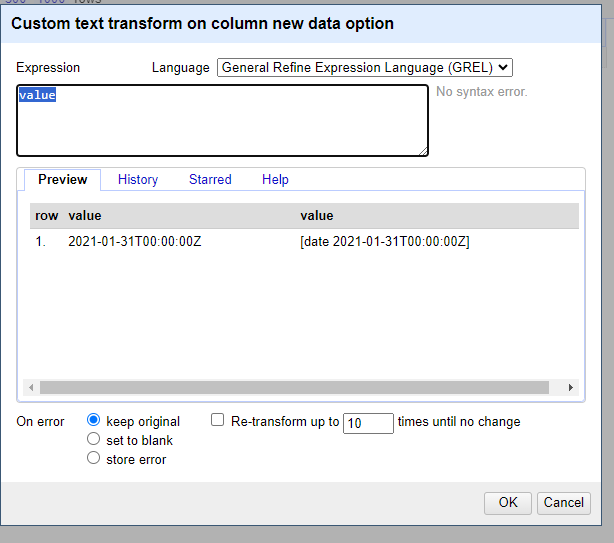
Examples in Openrefine
When dealing with dates using Openrefine, there are a few base tricks that are useful to wrangle your dates in the correct format.
The examples below show how to use the
Openrefineand format your data to the ISO-8601 standard. Here is an overview of the Openrefine data functions. In openrefine code has to be entered here:
01/31/2021 17:00 GMT
Chooseedit cells, –>common transforms–>toDateChooseadd column based on this columnvalue.toDate('yyyy/mm/dd').toString('yyyy-MM-dd')If you have multiple date formats in one column.
value.toDate('MM/yy','MMM-yy').toString('yyyy-MM')“If parsing a date with text components in a language other than your system language you can specify a language code as the format1 argument. For example, a French language date such as “10 janvier 2023”.
value.toDate('fr','dd MMM yyyy')Another option is to split your date columns in 3 separate columns using the split function. After splitting join the columns in a data format code:
cells["year"].value + "-" +cells["month"].value + "-" + cells["day"].value

Examples in Python
When dealing with dates using pandas in Python it is best to create a Series as your time column with the appropriate datatype. Then, when writing your file(s) using .to_csv() you can specify the format which your date will be written in using the
date_formatparameter.The examples below show how to use the pandas.to_datetime() function to read various date formats. The process can be applied to entire columns (or Series) within a DataFrame.
01/31/2021 17:00 GMTThis date follows a typical date construct of
month/day/year24-hour:minutetime-zone. The pandas.to_datetime()function will correctly interpret these dates without theformatparameter.import pandas as pd df = pd.DataFrame({'date':['01/31/2021 17:00 GMT']}) df['eventDate'] = pd.to_datetime(df['date'], format="%m/%d/%Y %H:%M %Z") dfdate eventDate 01/31/2021 17:00 GMT 2021-01-31 17:00:00+00:00
31/01/2021 12:00 ESTThis date is similar to the first date but switches the
monthanddayand identifies a differenttime-zone. The construct looks likeday/month/year24-hour:minutetime-zoneimport pandas as pd df = pd.DataFrame({'date':['31/01/2021 12:00 EST']}) df['eventDate'] = pd.to_datetime(df['date'], format="%d/%m/%Y %H:%M %Z") dfdate eventDate 31/01/2021 12:00 EST 2021-01-31 12:00:00-05:00
January, 01 2021 5:00 PM GMTimport pandas as pd df = pd.DataFrame({'date':['January, 01 2021 5:00 PM GMT']}) df['eventDate'] = pd.to_datetime(df['date'],format='%B, %d %Y %I:%M %p %Z') dfdate eventDate January, 01 2021 5:00 PM GMT 2021-01-01 17:00:00+00:00
1612112400in seconds since 1970This uses the units of
seconds since 1970which is common when working with data in netCDF.import pandas as pd df = pd.DataFrame({'date':['1612112400']}) df['eventDate'] = pd.to_datetime(df['date'], unit='s', origin='unix') dfdate eventDate 1612112400 2021-01-31 17:00:00
44227.708333333333This is the numerical value for dates in Excel because Excel stores dates as sequential serial numbers so that they can be used in calculations. In some cases, when you export an Excel spreadsheet to CSV, the dates are preserved as a floating point number.
import pandas as pd
df = pd.DataFrame({'date':['44227.708333333333']})
df['eventDate'] = pd.to_datetime(df['date'].astype(float), unit='D', origin='1899-12-30')
df
date eventDate 44227.708333333333 2021-01-31 17:00:00.000000256Observations with a start date of
2021-01-30and an end date of2021-01-31.Here we store the date as a duration following the ISO 8601 convention. In some cases, it is easier to use a regular expression or simply paste strings together:
import pandas as pd
df = pd.DataFrame({'start_date':['2021-01-30'],
                   'end_date':['2021-01-31']})
df['eventDate'] = df['start_time']+'/'+df['end_time']
df
start_time end_time eventDate 2021-01-30 2021-01-31 2021-01-30/2021-01-31
Examples in R
When dealing with dates using R, there are a few base functions that are useful to wrangle your dates in the correct format. An R package that is useful is lubridate, which is part of the
tidyverse. It is recommended to bookmark this lubridate cheatsheet.The examples below show how to use the
lubridatepackage and format your data to the ISO-8601 standard.
01/31/2021 17:00 GMTlibrary(lubridate) date_str <- '01/31/2021 17:00 GMT' lubridate::mdy_hm(date_str,tz="UTC") date <- lubridate::format_ISO8601(date) # Separates date and time with a T. date <- paste0(date, "Z") # Add a Z because time is in UTC.[1] "2021-01-31T17:00:00Z"
31/01/2021 12:00 ESTlibrary(lubridate) date_str <- '31/01/2021 12:00 EST' date <- lubridate::dmy_hm(date_str,tz="EST") lubridate::with_tz(date,tz="UTC") date <- lubridate::format_ISO8601(date) date <- paste0(date, "Z")[1] "2021-01-31T17:00:00Z"
January, 01 2021 5:00 PM GMTlibrary(lubridate) date_str <- 'January, 01 2021 5:00 PM GMT' date <- lubridate::mdy_hm(date_str, format = '%B, %d %Y %H:%M', tz="GMT") lubridate::with_tz(date,tz="UTC") lubridate::format_ISO8601(date) date <- paste0(date, "Z")[1] "2021-01-01T17:00:00Z"
1612112400in seconds since 1970This uses the units of
seconds since 1970which is common when working with data in netCDF.library(lubridate) date_str <- '1612112400' date_str <- as.numeric(date_str) date <- lubridate::as_datetime(date_str, origin = lubridate::origin, tz = "UTC") date <- lubridate::format_ISO8601(date) date <- paste0(date, "Z") print(date)[1] "2021-01-31T17:00:00Z"
44227.708333333333This is the numerical value for dates in Excel because Excel stores dates as sequential serial numbers so that they can be used in calculations. In some cases, when you export an Excel spreadsheet to CSV, the dates are preserved as a floating point number.
library(openxlsx)
library(lubridate)
date_str <- 44227.708333333333
date <- as.Date(date_str, origin = "1899-12-30") # If you're only interested in the YYYY-MM-DD
fulldate <- openxlsx::convertToDateTime(date_str, tz = "UTC")
fulldate <- lubridate::format_ISO8601(fulldate)
fulldate <- paste0(fulldate, "Z")
print(date)
print(fulldate)
[1] "2021-01-31" [1] "2021-01-31T17:00:00Z"Observations with a start date of
2021-01-30and an end date of2021-01-31. For added complexity, consider adding in a 4-digit deployment and retrieval time.Here we store the date as a duration following the ISO 8601 convention. In some cases, it is easier to use a regular expression or simply paste strings together:
library(lubridate)
event_start <- '2021-01-30'
event_finish <- '2021-01-31'

deployment_time <- 1002
retrieval_time <- 1102

Time is recorded numerically (1037 instead of 10:37), so need to change these columns:
deployment_time <- substr(as.POSIXct(sprintf("%04.0f", deployment_time), format = "%H%M"), 12, 16)
retrieval_time <- substr(as.POSIXct(sprintf("%04.0f", retrieval_time, format = "%H%M"), 12, 16)

# If you're interested in just pasting the event dates together:
eventDate <- paste(event_start, event_finish, sep = "/")

# If you're interested in including the deployment and retrieval times in the eventDate:
eventDateTime_start <- lubridate::format_ISO8601(as.POSIXct(paste(event_start, deployment_time), tz = "UTC"))
eventDateTime_start <- paste0(eventDateTime_start, "Z")
eventDateTime_finish <- lubridate::format_ISO8601(as.POSIXct(paste(event_finish, retrieval_time), tz = "UTC"))
eventDateTime_finish <- paste0(eventdateTime_finish, "Z")
eventDateTime <- paste(eventDateTime_start, eventDateTime_finish, sep = "/")

print(eventDate)
print(eventDateTime)
[1] "2021-01-30/2021-01-31" [1] "2021-01-30T10:02:00Z/2021-01-31T11:02:00Z"
Tip
When all else fails, treat the dates as strings and use substitutions/regular expressions to manipulate the strings into ISO 8601.
Matching your scientific names to a taxonomic backbone
Introduction
Working with different partners/institutes/researchers results in a diversity of taxonomic names to define species. This hardens comparison amongst datasets, as in many occasions, aggrgeation is aimed for or filtering on specific species. By translating all species names to a common taxonomic backbone (ensuring unique ID’s for each species name), this can be done.
| Darwin Core Term | Description | Example |
|---|---|---|
| scientificNameID | An identifier for the nomenclatural (not taxonomic) details of a scientific name. | urn:lsid:ipni.org:names:37829-1:1.3 |
| kingdom | The full scientific name of the kingdom in which the taxon is classified. | Animalia, Archaea, Bacteria, Chromista, Fungi, Plantae, Protozoa, Viruses |
| taxonRank | The taxonomic rank of the most specific name in the scientificName. | subspecies, varietas, forma, species, genus |
Using the commandline using Python
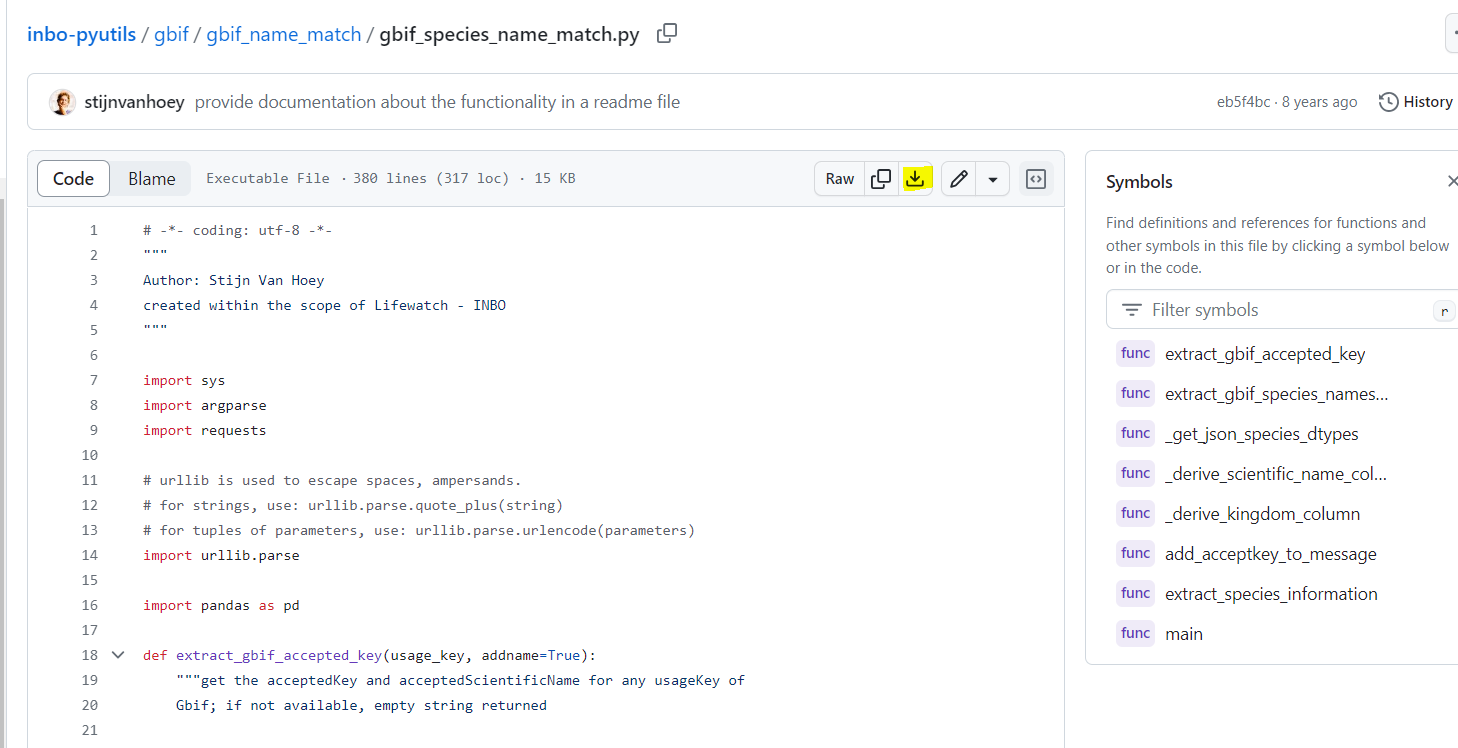
This small utility provides the functionality to add the species information from the GBIF backbone to any data table (CSV-style or a > Pandas dataframe) by requesting this information via the GBIF API. For each match, the corresponding accepted name is looked for. Nevertheless there will always be errors and control is still essential, the acceptedkeys provide the ability to compare species names from different data sources. The functionality can be loaded within Python itself by importing the function
extract_species_informationor by running the script from the command line. We will show you on how to use the command line
Create a folder which will be used for name matching.
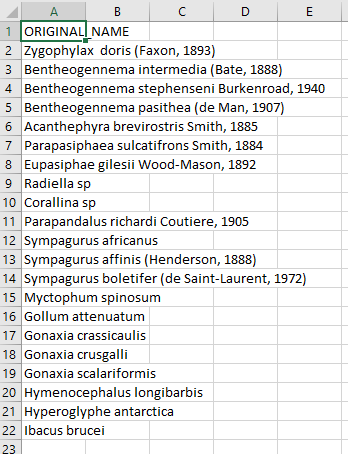
Place your CSV (comma separated value) file with the scientific names of the species of interest in that folder. Here we are showing some of the contents of the file
species.csv.Place this Python file gbif_species_name_match.py in your name matching folder
Navigate in the Python terminal to the correct folder.
Run the command > python gbif_species_name_match.py yourfilename_input.csv yourfilename_output

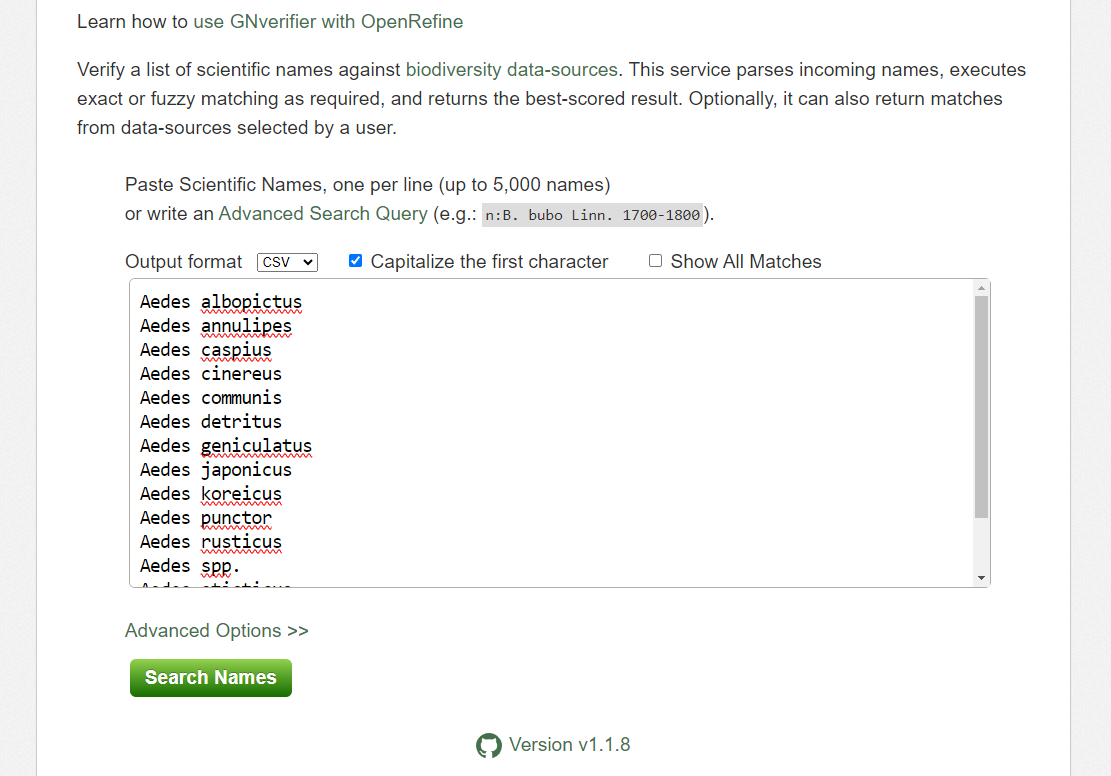
Using the Global Names Verifier
Verify a list of scientific names against biodiversity data-sources. This service parses incoming names, executes exact or fuzzy matching as required, and returns the best-scored result. Optionally, it can also return matches from data-sources selected by a user.
Create a CSV (comma separated value) file with the scientific name of the species of interest. Here we are showing some of the contents of the file
species.csv.Copy your scientific names to the Global Names Verifier
Click on Search Names. Don’t forget to choose your output format (here choose .csv)
Hopefully, your names will be matched
- In some cases you will have ambiguous matches.
- Capy you response and use it building your Darwin Core file
Getting lat/lon to decimal degrees
Latitude (decimalLatitude) and longitude (decimalLongitude) are the geographic coordinates (in decimal degrees north and east, respectively), using the spatial reference system given in geodeticDatum of the geographic center of a location.
decimalLatitude, positive values are north of the Equator, negative values are south of it. All values lie between -90 and 90, inclusive.decimalLongitude, positive values are east of the Greenwich Meridian, negative values are west of it. All values lie between -180 and 180, inclusive.
Note, that the requirement for decimalLatitude and decimallLongitude is they must be in decimal degrees in WGS84. Since this is the requirement for Darwin Core, OBIS and GBIF will assume data shared using those Darwin Core terms are in the geodetic datum WGS84. We highly recommend checking the coordinate reference system (CRS) of your observations to confirm they are using the same datum and documenting it in the geodeticDatum Darwin Core term. If your coordinates are not using WGS84, they will need to be converted in order to share the data to OBIS and GBIF since decimalLatitude and decimalLongitude are required terms.
Helpful packages for managing CRS and geodetic datum:
Tip
If at all possible, it’s best to extract out the components of the information you have in order to compile the appropriate field. For example, if you have the coordinates as one lone string
17° 51' 57.96" S 149° 39' 13.32" W, try to split it out into its component pieces:17,51,57.96,S,149,39,13.32, andWjust be sure to track which values are latitude and which are longitude.
| Darwin Core Term | Description | Example |
|---|---|---|
| decimalLatitude | The geographic latitude (in decimal degrees, using the spatial reference system given in geodeticDatum) of the geographic center of a Location. Positive values are north of the Equator, negative values are south of it. Legal values lie between -90 and 90, inclusive. | -41.0983423 |
| decimalLongitude | The geographic longitude (in decimal degrees, using the spatial reference system given in geodeticDatum) of the geographic center of a Location. Positive values are east of the Greenwich Meridian, negative values are west of it. Legal values lie between -180 and 180, inclusive. | -121.1761111 |
| geodeticDatum | The ellipsoid, geodetic datum, or spatial reference system (SRS) upon which the geographic coordinates given in decimalLatitude and decimalLongitude as based. | WGS84 |
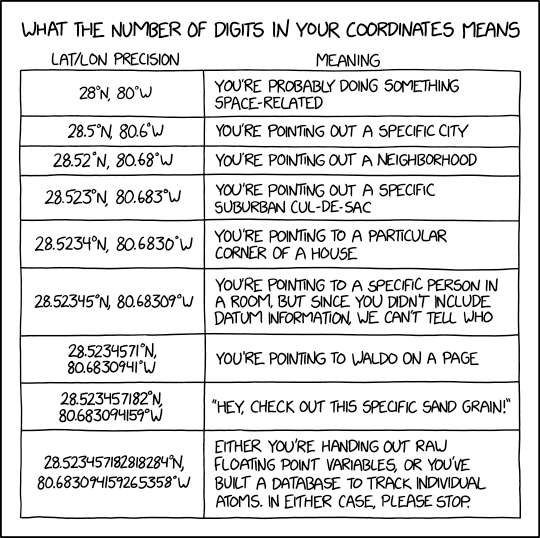 Image credit: xkcd
Examples in Python
17° 51' 57.96" S149° 39' 13.32" W
- This example assumes you have already split the two strings into discrete components (as shown in the table). An example converting the full strings
17° 51' 57.96" S149° 39' 13.32" Wto decimal degrees can be found here.
lat_degrees lat_minutes lat_seconds lat_hemisphere lon_degrees lon_minutes lon_seconds lon_hemisphere 17 51 57.96 S 149 39 13.32 W df = pd.DataFrame({'lat_degrees':[17], 'lat_minutes':[51], 'lat_seconds':[57.96], 'lat_hemisphere':['S'], 'lon_degrees': [149], 'lon_minutes': [39], 'lon_seconds':[13.32], 'lon_hemisphere': ['W'], }) df['decimalLatitude'] = df['lat_degrees'] + ( (df['lat_minutes'] + (df['lat_seconds']/60) )/60) df['decimalLongitude'] = df['lon_degrees'] + ( (df['lon_minutes'] + (df['lon_seconds']/60) )/60) # Convert hemisphere S and W to negative values as units should be `degrees North` and `degrees East` df.loc[df['lat_hemisphere']=='S','decimalLatitude'] = df.loc[df['lat_hemisphere']=='S','decimalLatitude']*-1 df.loc[df['lon_hemisphere']=='W','decimalLongitude'] = df.loc[df['lon_hemisphere']=='W','decimalLongitude']*-1 df[['decimalLatitude','decimalLongitude']]decimalLatitude decimalLongitude -17.8661 -149.653733° 22.967' N117° 35.321' W
- Similar to above, this example assumes you have already split the two strings into discrete components (as shown in the table).
lat_degrees lat_dec_minutes lat_hemisphere lon_degrees lon_dec_minutes lon_hemisphere 33 22.967 N 117 35.321 W df = pd.DataFrame({'lat_degrees':[33], 'lat_dec_minutes':[22.967], 'lat_hemisphere':['N'], 'lon_degrees': [117], 'lon_dec_minutes': [35.321], 'lon_hemisphere': ['W'], }) df['decimalLatitude'] = df['lat_degrees'] + (df['lat_dec_minutes']/60) df['decimalLongitude'] = df['lon_degrees'] + (df['lon_dec_minutes']/60) # Convert hemisphere S and W to negative values as units should be `degrees North` and `degrees East` df.loc[df['lat_hemisphere']=='S','decimalLatitude'] = df.loc[df['lat_hemisphere']=='S','decimalLatitude']*-1 df.loc[df['lon_hemisphere']=='W','decimalLongitude'] = df.loc[df['lon_hemisphere']=='W','decimalLongitude']*-1 df[['decimalLatitude','decimalLongitude']]decimalLatitude decimalLongitude 0 33.382783 -117.588683
Examples in R
17° 51' 57.96" S149° 39' 13.32" W
lat_degrees lat_minutes lat_seconds lat_hemisphere lon_degrees lon_minutes lon_seconds lon_hemisphere 17 51 57.96 S 149 39 13.32 W library(tibble) tbl <- tibble(lat_degrees = 17, lat_minutes = 51, lat_seconds = 57.96, lat_hemisphere = "S", lon_degrees = 149, lon_minutes = 39, lon_seconds = 13.32, lon_hemisphere = "W") tbl$decimalLatitude <- tbl$lat_degrees + ( (tbl$lat_minutes + (tbl$lat_seconds/60)) / 60 ) tbl$decimalLongitude <- tbl$lon_degrees + ( (tbl$lon_minutes + (tbl$lon_seconds/60)) / 60 ) tbl$decimalLatitude = as.numeric(as.character(tbl$decimalLatitude))*(-1) tbl$decimalLongitude = as.numeric(as.character(tbl$decimalLongitude))*(-1)> tbl$decimalLatitude [1] -17.8661 > tbl$decimalLongitude [1] -149.6537
33° 22.967' N117° 35.321' W
lat_degrees lat_dec_minutes lat_hemisphere lon_degrees lon_dec_minutes lon_hemisphere 33 22.967 N 117 35.321 W library(tibble) tbl <- tibble(lat_degrees = 33, lat_dec_minutes = 22.967, lat_hemisphere = "N", lon_degrees = 117, lon_dec_minutes = 35.321, lon_hemisphere = "W") tbl$decimalLatitude <- tbl$lat_degrees + ( tbl$lat_dec_minutes/60 ) tbl$decimalLongitude <- tbl$lon_degrees + ( tbl$lon_dec_minutes/60 ) tbl$decimalLongitude = as.numeric(as.character(tbl$decimalLongitude))*(-1)> tbl$decimalLatitude [1] 33.38278 > tbl$decimalLongitude [1] -117.5887
33° 22.967' N117° 35.321' W
- Using the measurements package the
conv_unit()can work with space separated strings for coordinates.
lat lat_hemisphere lon lon_hemisphere 33 22.967 N 117 35.321 W tbl <- tibble(lat = "33 22.967", lat_hemisphere = "N", lon = "117 35.321", lon_hemisphere = "W") tbl$decimalLongitude = measurements::conv_unit(tbl$lon, from = 'deg_dec_min', to = 'dec_deg') tbl$decimalLongitude = as.numeric(as.character(tbl$decimalLongitude))*(-1) tbl$decimalLatitude = measurements::conv_unit(tbl$lat, from = 'deg_dec_min', to = 'dec_deg')> tbl$decimalLatitude [1] 33.38278 > tbl$decimalLongitude [1] -117.5887
You can find some more tutorials on data transformation and publication on the INBO tutorial page: https://inbo.github.io/tutorials/
Key Points
When doing conversions it’s best to break out your data into it’s component pieces.
Dates are messy to deal with. Some packages have easy solutions, otherwise use regular expressions to align date strings to ISO 8601.
Latitude and longitudes are like dates, they can be messy to deal with. Take a similar approach.